Adventures with Worms
Worms are natures wonder creatures. These little critters process waste and through natural digestion create juice and worm castings that are high in nutrients. The ‘Castings’ and the ‘Juice’ are tonic for your garden and can be used on everything from veggies to flowers and even your indoor plants.

My worm farm was originally purchased for my father as a gift over 12 years ago – it was returned to me when we sold ‘Greenacres’ and has been in heavy production since I moved to Arundel. By trial and error I have developed a system that works for me.
How Have I Achieved Success?
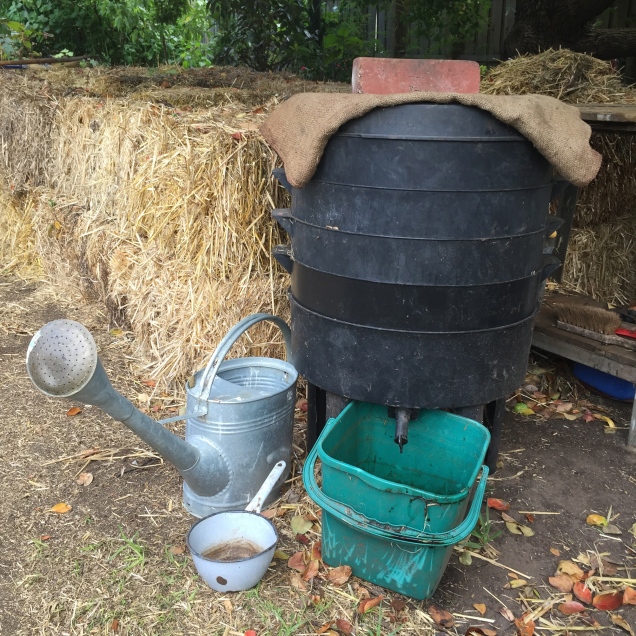
The worm farm is managed as a stack of ‘filters’. The key to a good outcome is to keep the base where the liquid drains as clear and clean of worm castings as possible. This ensures the juice flows freely through the dispensing tap and does not pool and stagnate. To assist drainage I have my worm farm slightly tilted, the dispensing tap permanently ‘open’ with a bucket at the base to catch all the drips. I use 1 part juice to 10 parts water and spread it on the garden in a watering can, often mixed with a measure of seaweed fertilizer as a ‘garden tonic’.

The base is topped with four trays, the top tray is the ‘feeder’ tray and has a lid topped with a hessian blanket. The base with legs (bottom layer) has a tap attached and is where worm juice drains.

The middle trays are filter trays. Cardboard, shredded newspaper and straw are spread to catch and filter the juice and fine castings that dribble down from the top layer. The tray immediately below the main ‘farm’ can be quite damp and covered with worm castings. This layer will eventually be transferred to the top.
While the majority of the worms will be clustered in the top tray some worms will move up and down travelling through the various levels via the sieve like holes in the trays.

In the past I have had a problem with the fine castings building up and blocking the base and preventing the juice from flowing freely through the dispensing tap. I solved this problem by lining the middle layers with paper and straw using this material as an organic filter. I never have a blockage problem now and only occasionally take the base away and hose it out. The paper and straw eventually breaks down and forms part of the organic waste that the worms convert. The filter material needs occasional topping up and to help the worms along I always use slightly damp filter material.

At the Top Where All the Action Is………
The very top layer has the majority of worms and rotting vegetable material. Worms like soft fruits and veggies. I have discovered over grown zucchini is a favourite, as are watermelon and banana skins. Cut your excess fruit and vegetables and place flesh side down, skin side up – they will devour the core of the material very quickly. I also add semi-rotted straw and finely shredded newspaper, giving the mix an occasional gentle stir. When I am ‘feeding’ the worms I tend to place waste in a clump, on one side of the farm, placing a clump on the opposite side with the next deposit. I am unsure why this works best but it gives the worms time to demolish one area and happily move onto the next deposit. I would feed my farm at least once a week, however when busy this might stretch to two weeks. The time span can be longer between feeds but you need to ensure there is other organic matter (like wet straw) to keep them going.

Finally I sweeten the ‘feeding’ layer with an occasional sprinkle of used coffee grinds, worms like the grit. I also use finely ground eggshells, this adds calcium to the mix and helps correct the ph balance in the farm which can be slightly acidic.
Maintenance…….
About every 4 months (sometimes longer) I change the trays around.
I use the second layer and transfer it to the top as the new ‘feeder’ layer. When removing the ‘feeding’ tray scoop any half rotten material into the new tray– I have a plate of tasty worm treats ready – made up of the most tempting waste (banana skins, fruit ends, soft veggies).

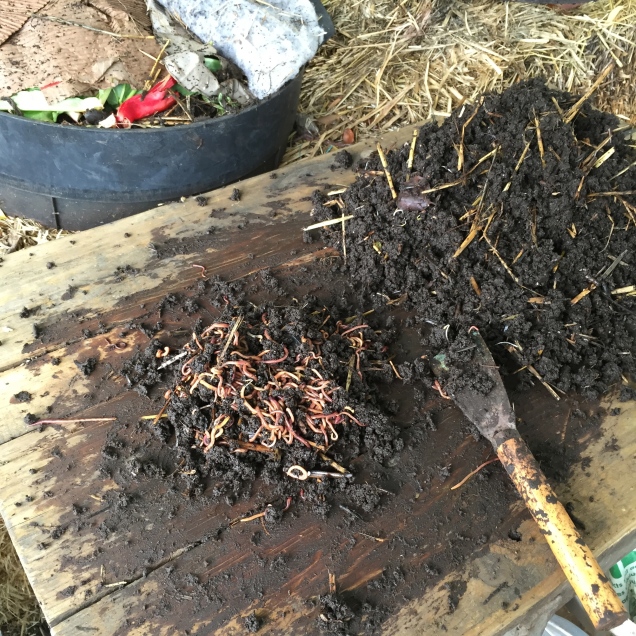
I then empty the old feeding tray onto a work table forming a hillock, again transferring any soft scraps to the new ‘feeder’ tray. The worms will move quickly into the middle of the hillock away from the light. Start by gently removing the outer layer of castings and scoop in small amounts into a bucket. Move any worms you collect into the new ‘feeder’ tray, these are your breeding stock and the source of the next generation of worms. Keep transferring small scoops to your casting bucket. I will often do this over an afternoon, moving between gardening jobs, coming back every 30 minutes or so to remove a few more small scoops.

Gradually you will have a bucket full of worm castings and a hillock of thriving worms, all trying to find the darkest spot. Move the worms to your new tray and feed them with some tasty rotting morsels to restart the cycle. Wash the old tray. I usually do this in a spot where I am about to plant new young seedlings, making the most of the washed castings. Finally line the clean tray with shredded paper and soaked straw and transfer to the bottom of the stack as a new filter base.

Month by Month stuff to do…………
If we were discussing ‘normal’ livestock or pet management we would be talking about ‘day to day’ care. A worm farm will survive on ‘managed neglect’. Month to month is fine. Worms enjoy a dark moist (not wet) environment that is slightly warm – never hot. I use corrugated cardboard over the top of the waste then cover this with the ‘worm blanket’, cap the unit with its lid and place a hessian sack over everything. By keeping the worm farm in a shaded spot over summer I stabilize the temperature and moisture levels. Moving it to a place where it catches a little sun in winter does the same thing and keeps the worms active. The straw and paper in the ‘filter’ system means the worms always have something to ‘eat’. Feeding with kitchen waste can happen sporadically. If I am going away I put the farm in a shaded spot, make sure it’s topped up with goodies and put a bit of extra damp straw in place. The farm will happily look after itself for 6 to 8 weeks without any attention. The perfect ‘pet’ for busy people.

My system is made in Australia. I recently purchased an extra tray to increase efficiency. A similar model can be bought from large plant nurseries and hardware stores. New units come with a list of instructions, these can also be found online – my original instructions had been lost so I went hunting and found the makers instructions.
If you’re starting from the very beginning you will need to also purchase worms. I was surprised how much they cost when I originally purchased the farm for my father. When I set up the farm here at Arundel I collected my own worms from my cool compost heap – it is important to get the right worms – red wrigglers – I call them fast worms. I have ‘gifted’ worms to family and friends – a strange thing to offer but wonderful if your setting up a worm farm.
Making Do………..
If cost is an issue you could improvise with a series of stacking Styrofoam boxes from the green grocer, drill extra holes to allow adequate drainage. You could also repurpose an old esky, bath or trough, whatever your system it needs to be raised and free draining. You must also think about how you are going to ‘catch’ the juice. The system needs to drain to ensure it does not become fetid.

Worms don’t need a lot of attention – just a little care. One of natures ‘wonder creatures’ they are the perfect pet for the busy household – your own urban farm, the livestock processing your waste and transforming it into liquid magic for your garden.
Happy Farming
